Gran soren
Содержание:
Tactics
Offensive
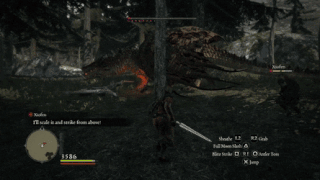
- The Wyvern spends far more time flying than it does on the ground. In fact, it will not land unless it is stunned or knocked out of the air, and even after it recovers, it will go back to the air as soon as it can. While aloft, the tail can be grabbed and scaled in order to reach the heart.
- For general climbing tactics see Climbing.
Heart located on the back.
- The Wyvern is a strong flyer and makes great efforts to dislodge any climber which makes attacking an aloft Wyvern’s heart difficult or nearly impossible without Adhesion (much like the bucking Cockatrice).
- Most bow and ranged spell attacks will knock a Wyvern out of the sky — the creature is easier to attack once grounded, and briefly highly vulnerable when initially grounded.
- Destroy the wings to prevent the creature taking flight again.
- For general climbing tactics see Climbing.
- The heart of a Wyvern, unlike other Dragons, isn’t located on the breastbone, but instead is on its back, between the wings.
- All vocations: attack the heart.
- To kill a Wyvern, the Arisen must land the final blow to its heart.
- Vulnerable to Torpor.
- Immune to lowered attributes, Curse, Blindness, Drenched, Tarred, Sleep and Petrification.
- Resistant to Lightning.
- Can be set on fire and poisoned.
- May be slightly frozen, but not shattered.
- The head and wings are minor weak points.
- Interrupting Stifling gasp attack will cause knockdown reliably.
Defensive
- Can be Silenced
Silence does not prevent the Dragon Roar.
, preventing spellcasting.
- The augment Stability or armor with the bonus enhancement «Prevents wind from affecting mobility» prevents being staggered or knocked down by a Dragon’s wing’s wind buffet.
- The lifting up and Fall Damage caused by the electric windblast is not prevented by stability.
- Alternatively, the Arisen can jump just before the wind attack to avoid its effect, or block it with a Shield or Magick Shield.
- Well timed Instant Reset can completely nullify propelling effect of Windblast attack
Pawn-specific
- Mage pawns with a Legion’s Might staff will self-resurrect after a Dragon Roar or conventional death.
- Strider pawns with a Scather inclination are effective pawns for climbing a Wyvern and shredding the heart.
- Consider equipping the pawns with upgraded rusted or golden weapons to torpor or silence the Wyvern.
- Attempts at Possession
Pawns with 100% resistance to possession are unaffected by the grab attack. They free themselves at the end of the grab animation; the futile attempt at possession gives a strategic opening for the rest of the party, allowing them to prepare long cast time spells or charged skills.
of allied pawns can be interrupted by staggering.
Luring Wyverns
Wyverns are sometimes difficult to engage in battle, as they will often fly off before attacking the party. This is especially true of the Wyverns on Conquest Road in Gransys.
- The Estan Plains Wyvern is near the shore south of Gran Soren. It can be seen taking flight when exiting through the southern gate and circling the area to the south of Gran Soren when the party approaches from the Moonsbit Pass. It is also possible to engage this dragon from the northern edge of the Moonshower Cliffs. Once the Arisen enters the Post-Game Everfall (and initiates the quest Fathom Deep) the Dragon will no longer be found here.
- The Conquest Road Wyvern appears once the Post-Game Everfall is entered and the quest Fathom Deep is initiated. It can be made to attack by moving to a high point (e.g., near Windbluff Tower) and engaging with ranged weapons.
- When the ambush starts, it may get stuck flying up and down and will never engage. Placing a Portcrystal at the location the Wyvern spawns, then porting in, will cause it to engage as normal.
- The Wyvern may also attack at the Snow Harpy encounter on the road.

How to lure down the Wyvern on Conquest Road (Post-Game). Technique A
Already aware of the location of the Wyvern’s roosting spot (slightly east of Conquest Road), the Arisen runs directly to the Wyvern, jumps up and grabs onto it. Once the Wyvern takes flight, it is very difficult to lure it into landing instead of fleeing to the Bluemoon Tower. Attack the heart on its back in order to slay the Wyvern. The Wyvern’s roosting spot is marked on the map at the beginning and end of the video.

How to lure down the Wyvern on Conquest Road (Post-Game). Technique B
Because the Wyvern tends to flee, be sure to save the game before approaching Conquest Road. Stand on an elevated platform near the Snow Harpies and wait for the Wyvern to land. If it hovers low enough, grab its tail and climb up to its back to attack the heart.
Квесты, доступные после завершения сюжетного задания «A Rude Awakening» (битва с гидрой)
Cassardis
An Uninvited Guest (Pablos, гостиница)Говорим с отмеченными продавцами, докладываемся квестодателю, а затем просто ловим воришку. Его можно замедлить, ударив, или подождать у ворот, куда он так или иначе прибежит.
Deep Trouble (Poll, у колодца рядом с воротами)Спускаемся и убиваем всех сауриан.
Guard Duty (Madeleine, гостиница)Сопровождаем Маделейн в Encampment, после чего удовлетворяем просьбу девушки и даем 1000G на нужды.
Lost & Found (Ghief Adaro, у колодца или у себя дома)Идем в Witchwood, где и находим девушку, после чего сопровождаем ее к домику ведьмы. Туман в лесу можно развеять, уничтожив талисманы.Квест нужно выполнить до завершения сюжетного задания Lure of the Abyss.
Pawn Travel Knowledge
Areas that should be visited for Pawn travel knowledge are:
- Both east and west entrances.
- Leaper’s Ledge — both the slide entry points and stone stair exits.
- The natural stone bridge with Cyclops.
- Visiting the area of the eastern side of the broken bridge on the First Floor grants Pawn Travels Knowledge. (Revisiting this area several times may result in additional Knowledge.) The western side may also need to be visited.
- The climbable areas above the rock platforms where the Sulfur Saurians lurk may also yield Pawn Travels Knowledge.
- Slide down both the sides of the watery slide after the stone bridge.
Description
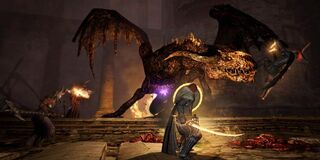
Cursed Dragons are enemies in Dragon’s Dogma: Dark Arisen.
Encountered on Bitterblack Isle, these undead dragons from origins unknown bear a striking visual similarity to a near death Ur-Dragon, however Cursed Dragons are smaller and less powerful. Instead of a heart, they have a single purple crystal in their chest, which the Cursed Dragon accompanying the Dark Bishop also lacks.
They breathe a vile and foul gas, which can inflict multiple debilitations and rots any time sensitive items in the party’s inventory.
Like the Ur-Dragon, the Cursed Dragon can be slain by a pawn if they strike the final blow to its crystal.
Pawn Bestiary Knowledge
Daimon casting his Vortex
- Attack his head in his first form
- Attack his chest head in his second form
- Second form chest head screams which try to possess pawns
- Witness the Rift Vortex attack
- Stagger him during the Rift Vortex attack to stop it
- Witness his different attacks (not well known. May need to witness all Daimon’s different attacks for it to be triggered)
In addition to witnessing these techniques, it is necessary for Pawns to participate in killing Daimon 10 times either with their own Arisen or while travelling with others.
More information can be found on the Bestiary page.
Pawn Chatter
- «Get swallowed up and it’s all over!»
- «Distance will not spare you from its claws!»
- «A nightmare… ‘Tis a nightmare made real…»
- «Stand as far from that tear as you’re able!»
- «That portal it opens… Is that the Rift?!»
- «‘Tis a Rift, I’m certain! But how…?»
- «Brute force and magick…and both well lethal!»
- «The great head sprouting from its belly controls the rest!»
- «Dragon’s breath?!»
- «‘Tis not the same creature… I sense the dragon!»
Overview
The Dragonforged is found in a cave under a set of standing stones at Hillfigure Knoll, in the Northface Forest. He is accompanied at all times, and only by his faithful pawn The Fool, who has come to closely resemble him. Supposedly a man who faced a dragon long ago, he is the only man who knows how to read Dragonspeak.
The Dragonforged is an Arisen from long ago — he created the warrior drawing on Hillfigure Knoll to draw Arisen to him, and seeks to guide any Arisen who come to him. A headless spear and shield can be seen in his cave, and on the knoll itself can be found the Signs of Valor, former spearheads used as daggers — it seems that all these were once the Dragonforged’s weapons, and the drawing on the hill likely depicts himself.
An Arisen also, his arms are burnt black — likely the reason for his namesake of «Dragonforged» is that his hands and legs underwent the process.
There are very few who know of the existence of this man and none knows the truth of his identity. There is only one thing that they know for sure about this puzzling individual: he knows more than anyone else living about dragons.His name and his ties are unknown. Equally mysterious is how he came to possess his considerable familiarity with dragons. However he came about it, the breadth of his knowledge is undeniable. He knows things that no person on the earth should know.No one else can say if the things which he says are true. Some consider him to be nothing but a fabricator of myths and lies. Still he does seem to know something about dragons and so—since his connection with the terrible beasts was the only fact that anyone alive knew about him—he came to be known only as the Dragonforged.
The Dragonforged’s Tale.
Tactics
Whilst summoning (indicated by the bright purple sigil) the Wight is much more susceptible to damage
Defensive
- In response to damage from magick and melee attacks Wights will often cast Silence and Torpor inducing spells respectively.
- If the debilitated attacker continues to do damage the Wight will then respond with Maelstrom.
- Wight starts Maelstrom casting with words ««From death comes peace!» and in the middle of casting follows with «From death comes freedom!».
- When possible one can rid of minions by luring the Wight out of the summoning area — far from it the Wight cannot summon new minions too.
Offensive
- Head is the weak spot.
- Weak against Holy enchanted weapons and spells.
- Weak against Blunt weapons, including arrows.
- Damage is greatly increased when using the Sickening Skull mace, and also by the Zombiebane magick shield.
- Vulnerable to Silence and Torpor.
- The creature takes more physical damage whilst intoning spells. Yet it is not more vulnerable to spells.
- Roughly two to three times when casting Maelstrom.
- Whilst summoning undead five times normal damage.
- Has significantly lowered knockdown resistance while casting Maelstrom.
- Once the summoned Undead
In this state it is low enough for even Fighters to strike it.
are defeated, the Wight will descend in order to summon new minions.
- Dealing enough damage will knock the Wight out of the air, leaving them temporarily vulnerable on the ground.
Tactics
Combat
- Fighters possess devastating close quarters swordplay skills. Attacks such as Dragon’s Maw, Burst Strike and Soul Skewer can easily quell most foes in one to three strikes. Dragon’s Maw is a must have skill to quickly decimate a large monster and is especially effective when focusing on a weak spot of a downed monster.
- Traveling with a powerful Sorcerer is an excellent addition to the Fighter’s play style. While the Fighter draws enemies toward him or herself, this gives ample time for the Sorcerer to charge up devastating magical attacks. This tactic is especially useful in all large monster battles.
- The Soul Skewer and Blink/Burst/Blitz Strike skills are very useful for stopping the movement and knocking down any monster up to the size of a Saurian, while dealing good damage. Useful for those annoying Wolves.
- Sheltered Assault/Fusillade is a very good skill for attacking a boss in the middle of an attack. It may burn up more stamina but you will be safe while stabbing at the boss.
- Shield Strike/Storm is perfect for breaking the guard of any enemy.
- Skyward/Heavenward Slash is useful for knocking low flying enemies from the sky and attacking tall enemies, like the Goat’s head of a Chimera.
- Tusk/Antler Toss is good at quickly knocking down foes, making it easy to follow up with a heavy jump attack.
- If you find yourself needing better defenses and shield strength use some augments from the Mystic Knight class to obtain them. Fighters will also benefit from the defensive and offensive augments of the Warrior class.
- The Fighter’s heavy jump attack strikes twice on hit, which is very effective on enemies that are knocked down, as well as being able to keep the enemy on the ground.
Other
- Use of powerful skills such as Dragon’s Maw uses up Fighter’s limited stamina pool quite quickly — luckily the game provides ample sources of said curatives such as mushrooms which are just about everywhere you will be adventuring. Take advantage of this and other resources when adventuring.
- When launched by a Fighter Pawn’s shield skill Launchboard you will automatically grab any monster you touch, so you don’t need to press «grab», it does it for you.
Kingdoms
Hearthstone
Hearthstone is a duchy or kingdom ruled by Grende Hearthstone of the House of Marten at the time of the third Gransys Dragon. Has an agreement or treaty of giving aid to countries attacked by the Dragon, which includes Gransys and Voldoa.
Meloire
Meloire is a duchy or kingdom. The House of Biquard, descended from a cousin of Godking Leonart, is one of the noble houses of the region and described as a mesne lord in Meloire. Warriors of Meloire are regarded as being well skilled.
Liore
A duchy or kingdom, Liore, formed from a split of the Liogran Peninsula along roughly north–south lines with Liore in the west and Gransys to the east around 250 years before the coming of the third great dragon.
Voldoa
A duchy or kingdom, Voldoa is part of a reciprocal agreement or treaty to render aid to countries attacked by the Dragon. This treaty includes Gransys and Hearthstone.
Like Liore, Voldoa also borders Gransys to the west.
Gransys
Gransys, a duchy or kingdom, and the setting of Dragon’s Dogma. Likely part of a relatively small island (around 3 miles across.), or peninsular created as a dukedom along with Liore around from a north–south split of the Liogran Peninsula, with Gransys forming the eastern part. Its capital is Gran Soren. Liore lies somewhere to the west of Gransys.
Gransys is ruled by Edmun Dragonsbane at the time of the coming of the Third Dragon; Edmun was Duke due to having been credited with the defeat of the Second Dragon. According to «Edmun’s Tale» Edmun became Duke on the death of the childless former Duke due to his own defeat of the dragon, however, Pawn testimony states that Edmun was crowned Duke on his triumphant return from slaying the Dragon, with no intermediate period mentioned.
Gransys covers the eastern part of a land mass — and is bounded by mountains to the west. There are two forts guarding routes west through the mountains: The Shadow Fort to the southwest of Gran Soren and The Greatwall to the west. The climate varies from cold in the north, to fairly temperate in the south.
Lewes has heard that beyond the mountains, far to the north is a path that leads to the Mainland.
Gran Soren
Gran Soren is the capital of Gransys; a walled city divided into quarters by internal walls. An open Craftsman’s Quarter to the west, with gate house; a heavily built up Urban Quarter lies to the east, with a gate house; and the Noble Quarter, accessed through fortified gates from both the urban and craftsman’s quarters. The Duke’s Demesne is accessed via a guarded and fortified gate from the noble quarter and includes a central keep with dungeons, surrounded by gardens, and a separate turreted tower to the northeast rising in the sea bay and linked to the main castle by a high-level stone walkway. An Aqueduct runs through the urban quarter, with a sea outflow to the east; the aqueduct area is also the location of the Slums.
Gran Soren’s urban quarter was almost totally destroyed after the death of the third great dragon, when the Everfall opened up. Most of the Venery and urban areas collapsed into the Everfall’s great pit.
Cassardis
Cassardis is a fishing village in the south east of Gransys, surrounded by a wall for protection.
Formerly autonomous. Became a protectorate under Gran Soren during the chiefdom of Adaro, at his bidding, for its greater safety.
Notes
- The Gransys shards appear randonly at only a fraction of the possible locations. Within one Arisen’s questline they will only appear a the original locations.
- Though Shards found in Gransys do not usually renew unless used, they will do so during Post-Game, even if they weren’t used by the Arisen.
- In New Game Plus they may appear at a different set of locations.
- Some such as the heart at Hillfigure Knoll seem more likely or guaranteed.
- In the The Everfall (Post-Dragon) creatures drop both Wakestones and Wakestone Shards — carrying Dragon’s Tears gives more of these rewards, though the effect may only to be to increase the number of Wakestones dropped, not shards.
Notes
- Drakes can be killed outright by a Maker’s Finger, but if hit by the secondary tendrils it will loose all its health, but the Arisen will need to strike the final blow.
- The Drake is lesser kin of The Dragon, one of three sub-species — it’s the Fire-based counterpart to the ice Wyrm and the thunder Wyvern
The Drake is the «land based» dragon, more likely to stay on the ground as opposed to take to the air; the Wyrm is a ground-based spell caster; and the Wyvern is the flyer.
.
- Having all three dragon tears in your inventory guarantees the Drake will drop a Wakestone (Post-Game Everfall only), and improves the chances of receiving the above drops.
- The Drake at the Conqueror’s Sanctuary (Post-Game
The Drake’s Tear item drop is significantly more for the Conqueror’s Sanctuary Drake.(verify)
) takes considerably longer to respawn, over twenty days (3 weeks+); other Drakes in Gransys tpyically re-appear after 1 week.
- (In Dark Arisen) saving shortly before (or exiting and saving during) a Dragon battle may increase its chances of flying off before the battle is complete.
- If a Pawn is possessed, unequipping all the Pawn’s weapons will render them harmless.
Exploits exist for farming drops from destroyed horns and wings — leaving far enough and returning, saving and loading, or setting up a Portcrystal and teleporting to it, with the dragon undefeated, will reset both the dragons’ health and bodyparts (which will regrow).
Pawn Bestiary Knowledge
Wing destruction. Note the Drake’s reel, the pawn’s immediate comment, the Great Dragon Alula as loot, and the immediate Dragon Roar once the Drake recovers
For full details of all Dragon species, see the Bestiary
Dragon species knowledge
- Draconian Strategy Vol. 1 — Knocking a Dragon off balance and to the ground will expose its heart.
- Draconian Strategy Vol. 2 — A Dragon is vulnerable to being staggered or knocked down when it is preparing its breath attack.
- Destroy the wings to ground them for the remainder of the fight. After knowledge is triggered Pawns will state «‘Tis grounded, Master!» or «On solid ground, the advantage is ours!»
- Destroyed horns drop as loot immediately. Pawns will notice «The horn is destroyed!»
- While a Dragon is hovering, attack its head, heart or wings to knock it to the ground.
- When a Dragon grabs a pawn and tries to possess them, a strong hit to the Dragon’s foreleg holding the pawn will stagger it and release the pawn.
- Strike the heart.
- Strike the face to stagger the beast creating opening.
Drake specific
Weak to Ice
In addition to witnessing these techniques, it is necessary for Pawns to participate in killing 15 Drakes either with their own Arisen or while traveling with others. Kills on Firedrakes also count towards the kill count.
Pawn Bestiary Knowledge
For full information, refer to the Bestiary page or the according section on the Drake page.
Enemy Specific:
- Weak to Holy
- Weak to Fire
- Let the poison breath attack hit you making time-sensitive items rot instantly. This may have to happen several times. Pawn’s comment, «Augh…our meat and vegetables rot» or «His putrid breath spoils our belongings» is not an indication that they learned this already.
- Let the Dark Bishop revive his pet Cursed Dragon after it dies. May need to be witnessed a few times.
- Let the Dark Bishop possess its pet Cursed Dragon. May also need to be witnessed a few times.
- Avoid head-on rushes.
- Perfect Block a lunge/bite attack.
- Witness the Cursed Dragon in The Fallen City cast spells.
In addition to witnessing these techniques, it is necessary for pawns to participate in killing over 15 Cursed Dragons with their own Arisen or while traveling with others.
It is thought that the Cursed Dragon accompanying the Dark Bishop and the Cursed Dragon in the Fallen City each generate unique knowledge flags that the standard Cursed Dragon spawning as a necrophagous beast does not.
Overview
| Type |
|
|---|---|
| Experiencegained | Base Experience of 25,000
Can be more or less depending on a few factors such as:
|
| Location |
Devilfire Grove’s Drake Estan Plains’ Drake Conqueror’s Sanctuary’s Drake Gransys Devilfire Grove
|
|
|
On death Dragon Scale (20%), Amber Dragon Scale (32%), Dragon Claw (12%), Indurated Dragonsblood (5%), Rift Cluster (5%), Drake’s Tear (5%), Dragon Horn (1%), Greatwyrm Stone (1%) Drake Horns destroyed Dragon Horn (100%) Drake Wing destroyed Great Dragon Alula (80%), Dragon Scale (14%), Amber Dragon Scale (5%), Drake’s Tear (1%) |
Stats
|
|||||||||||||||||||||||||||||||||||||
|
|||||||||||||||||||||||||||||||||||||
|
|||||||||||||||||||||||||||||||||||||
| Sources: Dragon’s Dogma — ドラゴンズドグマ & Dark Arisen (www10.atwiki.jp), the Dragon’s Dogma Signature Series Guide, List of Creature Debilitation Resistances, and in-game testing. |
- † The Conqueror’s Sanctuary Drake has higher defense (around 510), and considerably higher attack and aggression
Damage is modified relative to the Drake’s stats depending on where it is struck.
- Blows to the heart receive a 0.75x damage multiplier.
- The head receives a 0.3x multiplier.
- The wings receive a 0.3x multiplier.
- Other areas such as the tail, legs and body are even more armored and take very little damage, often 7.5% (0.075x) of calculated damage or even half that
- Both magick and physical damage are affected
- A reeling drake takes double normal damage
- When possessing a pawn damage is increased by 33.3%
Damage is also increased for physical bow users, and melee attacks when climbing
- Melee attacks from climbers get an additionally 1.5x damage boost (strider gets a further boost)
- Longbow and shortbow damage is doubled (when hitting the heart or head)
Attacks
| Attack | Type | Description |
|---|---|---|
| Fire Breath | Mag | A massive stream of fire is blasted from its mouth. Can cause Burning. The Drake can use this move either when pacing forward or backing away from its target(s). |
| Charge | Phys | Charges at a target on the ground to trample it. |
| Grab (Arisen) | Phys | The Arisen is grabbed and then slammed into the ground. |
| Grab (Pawn) | Spec/Status | A Pawn is grabbed but instead of being slammed into the ground, the Drake tries to seize control over the pawn. Causes Possession, which turns the Pawn against the Arisen. |
| Slam | Phys | Will take flight then drop suddenly to slam its torso into the ground, inflicting massive damage to anyone underneath. |
| Aerial Spin | Phys | If the Arisen or one of his/her Pawns are holding onto the Drake while it is in flight, it will spin rapidly, draining a massive chunk of stamina. |
| Stomp Attack | Phys | A powerful attack with its feet, staggers targets. |
| Sweeping Backhand | Phys | A backhanded slap with one of its front claws. |
| Tail Sweep | Phys | A powerful spinning attack with its tail, knocks targets off their feet. |
| Wing Flap | Phys | Powerful wing flaps that create strong winds preventing the party from approaching. |
| Dragon Roar | Spec/Status | A mighty roar that kills all Pawns within range, staggers the Arisen and can cause Skill Stifling, as well as rendering pawns unconscious. Dragons will immediately Roar in retaliation when one of its horns are destroyed, or when its wings are disabled.
A drake also roars when its heart is first exposed, but this does not skill stifling or render pawns unconscious |
| Fiery Drive By | Mag | After spending enough time in the air, while the party is using cover, flies up into the sky and then dives past a target, breathing fire, eventually clash landing at the target’s position similar to Griffin. The Dragon may perform multiple passes before landing again. |
- When a Dragon Horn is destroyed, Pawns will declare «The horn is destroyed!» and a piece of Dragon Horn will drop. There is a horn on either side of the head.
- Destroying the wings causes Pawns to declare «‘Tis grounded, Master!» or «On solid ground, the advantage is ours!» , and a Great Dragon Alula will drop.
- Intact horns can be destroyed after the Dragon is slain, likewise, an alula may by obtained by striking a dead Dragon’s back where the wings intersect.
Notes
- Levitate will not stop falling damage; it only serves as an extended jump, similar to Double Vault.
- Boons and Affinities alter Magick Bolt and Focused Bolt spells.
- Clicking down on the Left Analog Stick will target yourself (with applicable spells) or switch to manual targeting (with applicable spells); clicking down on the Right Analog will focus your targeting on one target (for offensive spells) and multi-hit spells likeHigh Levin will focus all strikes on that one target, rather than spreading the damage out.
- When Undead are in the field of Anodyne, Halidom, or Spellscreen, Holy damage is dealt to them.
- Blearing and Silentium do not deal Darkness damage, though they are listed as Dark elemental spells. Grapnel does actually deal slight Dark elemental damage.
The Equipment of the Mage in the Change Vocation Menu is the Wizard’s Set with some minor changes :
- Wooden Staff
- Blessed Vest / Magician’s Surcoat
- Bronze Bangles
- Cotton Hosen / Wizard’s Boots
- Mahogany Cape
Gallery
The Cursed Dragon’s Biting Assault, AKA «The Chomp»
The Cursed Dragon’s «Massive Breath Attack»

Cursed Dragon — Duskmoon — Solo warrior with Rusted Warhammer

2 Cursed Dragons slain with only Rusted Daggers B, Arisen undamaged
A Strider demonstration. (Hard mode)

Cursed Dragon slain with only Rusted daggers I, Arisen undamaged
An Assassin demonstrating Masterful Kill effectiveness. (Hard mode, 16 counters)

Fighter vs Cursed Dragon. One on one duel. Arisen is undamaged.
Demonstration of a shieldless Arisen utilising Hindsight Strike to evade and counter, and Heavenward Lash to strike the tail when it hovers overhead to bring it down. The poison breath can be avoided by hiding behind obstacles or grabbing onto its back. (Hard mode, with the Stability augment)

Farming Cursed Dragons with Comestion, Hard mode, party undamaged
This «blind spot» is safe from virtually all Cursed Dragon attacks. A perfect perch to spam spells like Comestion and Miasma.
Overview
Eliminators are huge, brawny undead humanoids found on Bitterblack Isle. They stand taller than any person, though smaller than an Ogre.
Eliminators don masks in the image of a bull, Fur Greaves and Cursed King’s Belts, and are armed with a Cyclops Sigil or Devil’s Nail.
There are two types of Eliminators: One wears a Persecutor’s Mask and is dark skinned, the second wears a Tormenter’s Mask and has much lighter skin. Both have the same amount of health, but the second version which appears only after Daimon is killed for the first time, is tougher. Both may drop their masks when killed.
All the evidence suggests that Eliminators are in fact undead. They receive increased damage from the Zombiebane shield, they are damaged from curative holy magick like Halidom, and they are healed by the ‘unholy-anodyne’ sigil cast by Liches.
Their attacks consist of many large-radius hammer blows and they are much faster than one would expect.
Enemies
Inhabitants include several Undead, Undead Warriors, Stout Undead, Giant Rats, Spiders, Phantoms, Skeletons including Skeleton Knights and Skeleton Mages, and a lesser Ogre.
During the quest A Parting Gift a Specter may be encountered, and during the Dark Arisen quest An Unseen Rival III two Living Armors.
Entrances and exits
The Catacombs’ main entrance is to the north of Deos Hills with a Riftstone next to it. Two other entrances to the Catacombs exist, but are initially blocked :
- Under the large bridge over the river near Gran Soren — an entrance in the bridges foundations, south of the Storage Shed (Catacombs Rear Passage 2) connecting to the northwestern part of the Catacomb’s ‘Third Level Underground’
- An entrance close to the Collapsed Meeting Room in the Estan Plains outside Gran Soren (Catacombs Rear Passage 1), connecting to the southestern part of the ‘Second Level Underground’.
Lower levels
The lower level (First Level Underground) can initially only be accessed via a lift. Underground tunnels and caverns lead to a second area of the Catacombs. Here the Gathering Hall chamber, in which the Arisen encounters Julien and the Elysion during Seeking Salvation has several «Remaining Eye» symbols painted on its walls. From this region there are the two minor exits from these caverns to above ground.
The path to the very lowest level is barred by locked gates — the gate on the first floor, next to the lift, is unlocked by the First Key To Salvation; the double gates on the second level, leading to a group of Stout Undead, is unlocked by the Second Key To Salvation. Within the lowest level is the Confessional Chamber, locked behind a magic door.
Tactics
- Immune to Blindness.
- Resistant against Ice enchanted weapons and magick.
- Weak against Holy and Lightning based magick and enchanted weapons.
- Vulnerable to Tarred in Oil.
- Vulnerable to Torpor, Poison, Petrification, and Sleep
Petrification may take 30-50 Petrifying Arrows to accomplish.
.
- Vulnerable to Lowered Strength such as inflicted with a Dragon’s Roost shield.
- Can be climbed.
- The face is the weak point.
- Garm behaviour and attack patterns are similar to that of Wolves — they will attempt to shake off the oil from their hides when tarred, and will roll on the ground when burning.
Defensive
- Garm cannot attack targets perched above them.
- At close distance Garm spew a toxic cloud which can cause Blindness. When the Garm lifts its head up and stands still, it is preparing to spew. The lingering cloud can blind the party even after the Garm is killed.
- Garm will try to get rid of their attacker by shaking and rolling on the ground when being climbed.
- Use Instant Reset and Controlled Fall to avoid being knocked down and grabbed.
- Avoid fighting packs of Garms without party to support you.
- Although the Garm’s Bite can be blocked, the window for Perfect Blocking is before the creature makes obvious moves to attack, thus making it very hard to do. The attack starts with a slightly faster than usual movement forward.(verify)

5 Garm 2 Hellhounds 2 Wargs slain with only Rusted Daggers B, Arisen undamaged
A Strider demonstrating Torpor effectiveness.

Magick Archer vs 3 Garm (using Ricochet Hunter)
In enclosed spaces Ricochet Hunter can make short work of Garm, which are weak to Lighting attacks.

Sopor vs 5 Garm
A Mystic Knight demonstrating Sopor effectiveness. Garm are helpless when asleep. Using a Rusted Staff can double debilitate them with both Torpor and Sleep.

Mystic Knight vs 5 Garm, 2 Hellhounds, 2 Wargs (A)