Экран главного меню
Содержание:
- Примеры
- How to choose your custom menu’s location
- Использование
- Step 1: Your Images
- Описание плагина DeluxeMenus:
- Pocket Edition[]
- Вступление
- Step #3: Discover More Submenu Style Settings
- Step #1: Add New Menu in Elementor
- Step #4: Set Main Menu Items Style
- Examples
- More to Love…
- How to add a social menu
- How to create custom menus in WordPress
- Основные права ChestCommands:
- History[]
- Вывод произвольных меню
Примеры
Если вы не хотите проходить через все ссылки, вы также можете перейти на вкладку изображения, чтобы увидеть некоторые результаты.
- Config / Результат
- Config / Результат
- Config / Результат
-
Config/ Result (Пользовательские цвета и текстуры текста кнопок) - Config / Результат
- Config / Результат
- Config / Результат
- Config / Результат
- Config / Результат
- Config / Результат
- Config / Результат
- Конфиг / Результат <- Пример слайд-шоу
- Конфиг / Результат <- Новые вещи действий
- Config / Результат
- Конфиг / Результат
- Конфиг / Результат
- Конфиг / Результат
- Конфиг / Результат
- Config / Результат
- Config (1) (2) / Результат
- Скоро будет (Также, если вы сделали что-то хорошее, не стесняйтесь публиковать конфигурацию и ее изображение)
Некоторые из этих примеров могут не работать / выглядеть должным образом с последней версией CMM из-за изменений в формате, но они все равно дадут представление о том, как был сделан материал, отображаемый в примере. Кроме того, некоторые из этих примеров могут потребовать пользовательских изображений, поэтому они также будут выглядеть немного странно, когда вы используете их сами.
Now that you have the custom menu ready, it’s time to choose where you want it to appear. But there’s an important thing to know here.
Not all the WordPress themes support multiple menus. The default number of menus is two: primary and secondary (in Twenty Fifteen’s case the second one is called Social Links Menu). Then, depending on your theme’s customization options, you can use more. For instance, some themes let you create footer and above-header menus apart from the default ones.
The secondary menu can appear in many different places depending on your theme’s structure and the overall idea that the designer had for the theme. There are no set-in-stone rules here, so you just have to experiment and always see how your menus look once you place them in a given location.
The footer menu will obviously go in the footer, and it can contain items like “Contact,” “About us,” or any other thing that can be found in the primary menu too.
Now, in my case, you will only see two menu options – primary and social – because the Twenty Fifteen theme supports only these too. But if your theme provides more menus, you can manage them from the Manage Locations tab right here:
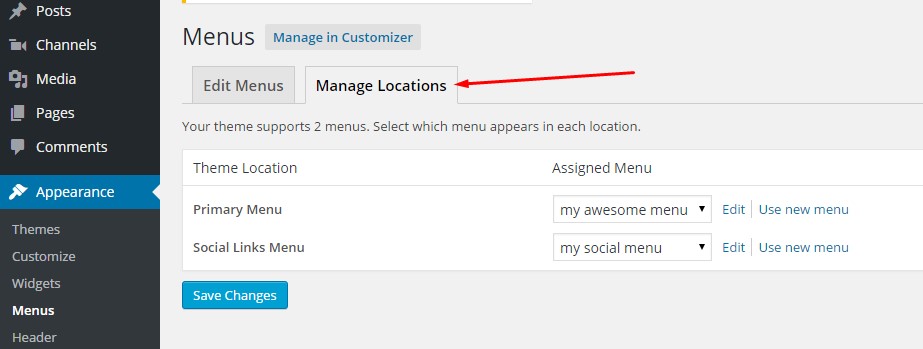
So, it’s your choice how many menus you use. If you’re planning to use more than two menus, check the theme’s settings beforehand.
Использование
После вашего первого запуска с этим модом единственное отличие, которое вы должны заметить, заключается в том, что в вашем главном меню добавлена дополнительная кнопка. Если вы посмотрите в файле config/CustomMainMenu папке вы увидите файл с названием меню.в формате JSON. Там вы увидите все элементы главного меню vanilla, изменение содержимого и нажатие кнопки обновления в игре позволит вам мгновенно увидеть, какие изменения вы внесли (вы можете удалить кнопку обновления, как только будете довольны своим результатом). Все, что там есть, должно быть достаточно понятным, если вы когда-либо работали с файлами json. Смотрите Страницы для получения дополнительной информации о различных вещах, которые вы можете добавить в свое меню.
Все скорописные свойства допускают случайное значение. Пример: «текст» : . Одно из значений будет выбираться случайным образом при каждом запуске майнкрафта.
Для свойства texture / image / text требуется местоположение ресурса (или (для изображений), если вы используете web в качестве домена ресурсов, URL-адрес изображения в Интернете). Вы можете добавить свои собственные ресурсы, используя либо пакет ресурсов, либо загрузчик ресурсов (проще).
Step 1: Your Images
This tutorial assumes you want to create a menu that uses images you created instead of the default text-only menu. As such, you will need to have made ready and prepared the VTF and VMT files for the following:
- New Game
- Load Game
- Options
- Quit
- Save Game
- Resume Game
-
Friends
Note: This tutorial does not include using Friends, but the implementation is easy enough.
Each menu option should have two images. An image that will be shown when the mouse is off it, and an image that is shown when the mouse is on it. If you DO NOT want rollovers, you merely need images for your menu options.
This tutorial will not cover how to create TGAs, VTFs, or VMTs. Please read Material Creation for information on how to create materials. You must put these images in the folder (or, at least your VMTs) for use in this tutorial.
Here’s an example file list for «New Game»:
menu_newgame.vtf
menu_newgame.vmt
menu_newgame_over.vtf
menu_newgame_over.vmt
Notes
When compiling your TGA file, in your image.txt file you will need:
"nonice" "1"
"nolod" "1"
"nomip" "1"
This will prevent your images from have a Level of Detail setting (so as not to degrade in quality when Texture Quality is set to low).
In your VMT, you should have to make sure your images are transparent. Example:
"UnlitGeneric"
{
	"$baseTexture" "vgui/menu_newgame"
	"$translucent" 1
}
Photoshop CS does not add transparency automatically to TGA files. Although, they can be exported in another format and then converted to TGA with a different program (e.g. PNG and ImageReady), it really isn’t necessary. Just select the area that you want to become transparent. Then go to Select at the top and then hit Inverse. Now On the window where you see your layers there should be some tabs.
Click on the «channels» tab. You should see a red, green, blue, and rgb channel. At the bottom there should be some buttons one of them looks like a square with a circle in it. Click that, it should create a new channel with the heading Alpha1 or Alpha. The way that alpha works is that anything that is white will show up and anything that is black will become transparent. Save this as a tga file and you have created a texture with a transparent background.
Описание плагина DeluxeMenus:
DeluxeMenus — это универсальный плагин для графического меню инвентаря! Вы можете создавать GUI меню, которые открываются с помощью пользовательских команд, которые будут отображать статистику или выполнять действия, специфичные для игрока, открывшего его. Ваши меню полностью настраиваются. Вы можете создавать меню, которые показывают определенные элементы различным игрокам, или выполнять разные действия в зависимости от того, какие требования они предъявляют к конкретному слоту в определенном графическом интерфейсе.
DeluxeMenus является хорошей заменой для уже устаревшего плагина ChestCommands
Pocket Edition[]
Телефоны и планшеты
Планшеты и телефоны для iOS и Android используют одинаковое управление. Раздельное управление, доступное для включения в настройках, отображает перекрестие прицела, как в Java Edition. Нажатие и удерживание при раздельном управлении сломает блок, а просто нажатие поставит его.
| Функция | Действие |
| Движение | Нажатие кнопок вперёд, назад, влево и вправо на джойстике на экране |
| Прыжок | Нажатие на квадрат на экране. Также персонаж сам перепрыгивает через блоки, когда двигается в их сторону. Используется для выхода из вагонеток. |
| Полёт | Нажатие на квадрат дважды. Для того, чтобы взлететь выше, задержите палец на квадрате и направьте его наверх, а для того, чтобы спуститься, сделайте тоже самое, только направьте палец вниз. Движения вперёд, назад, влево и вправо аналогичны обыкновенному передвижению. Игрок может летать только в Творчестве. |
| Установка блока | Нажатие на желаемую область для установки блока. |
| Разрушение блока | Удерживание пальца на области для разрушения блока. Процесс разрушения блока отображается в виде разрастающейся круглой иконки, появляющейся на месте удерживания пальца. Когда круг полностью разрастётся (до круглой границы), то блок будет сломан. |
| Атака | Нажмите на моба (либо на сущность вроде вагонетки) для атаки. |
| Движение камерой | Движение пальцем по экрану. |
| Использование предмета | Для использования таких предметов, как верстак, зажигалка, печь, ведро и т. д. нажмите на желаемый предмет.
Для использования инструментов, красителей, стрельбы снежками, съедения пищи и т. д. нажмите и удерживайте на желаемом предмете. |
| Выбрасывание предмета | Задерживание пальца на соответствующем предмете в панели быстрого доступа в течение 1 секунд. Это выбросит целую стопку. Для выбрасывания предмета из инвентаря напрямую откройте инвентарь, выберите предмет и нажмите на область вне инвентаря. |
| Приседание | Двойное нажатие на кнопку «Присесть» (выглядит как открытый круг). Повторное двойное нажатие возвращает игрока в нормальный режим. |
Xperia Play
| Кнопка | Функция |
|---|---|
| Правая кнопка-триггер | Установить блок |
| Левая кнопка-триггер | Разрушить блок |
| Открыть инвентарь | |
| Переключить предмет в панели быстрого доступа направо | |
| Прыжок | |
| Переключить предмет в панели быстрого доступа налево | |
| Навигационные клавиши | Передвижение |
| Левая сенсорная панель | Приседание |
| Правая сенсорная панель | Движение камерой |
| Меню | Открыть игровое меню |
| Сенсорный экран | Чат (только в сетевой игре) |
| Кнопка поиска | Переключить на вид от третьего лица (и наоборот) |
Вступление
Кастом меню (Custom menu) позволяет серверным администраторам добавлять новые пункты в меню администратора. Оно было разработано, чтобы позволить плагинам добавлять свои возможности в меню, без внесения изменений в исходный код, т.к. большинство людей не обладают необходимыми знаниями. Для более подробной информации смотрите Admin Menu (SourceMod Scripting).
Настраивается кастом меню через конфиг файл (расположен по пути: sourcemod/configs/adminmenu_custom.txt) и именно этот файл определяет, какие пункты или категории будут добавлены к стандартному меню при запуске сервера.
- Open Sub Menu settings. Here you can manage the submenu background, width, etc.
- Specify the submenu width in the corresponding field (in our case, it is 250 px).
- Select Classic background type and set the necessary background color (e.g., #221872 HEX value).
- Define the preferable border radius (we used 6 px).
- Set the needed border type (we used Solid border type).
- In the Width field you need to input the border width value (in our case, it is 1 px).
- Specify the border color (we used #221872 HEX color value).
- Enable Box Shadow option to apply the shadow to the submenu blocks.
- In the Color block specify the shadow color and opacity (we used rgba(0,0,0,0.5)).
- Set Blur to 10.
Step #1: Add New Menu in Elementor
- First, you need to open the page for editing with Elementor. Navigate to Pages > Add New tab on the left of the Dashboard.
- Click Edit with Elementor button.
- Click Add new section and define its structure in order to place a menu there.
- Select the necessary section structure.
- Locate Custom Menu content module.
- Drag and drop it to the area where you want to add it. You’ll see the Edit Custom Menu block on the left.
- In the Content block you need to specify the menu you want to display with Custom Menu module. Select the menu you want to add from the drop-down list of your existing menus.
-
Switch to Style tab to change the module style. You can see the detalied description of the Custom Menu module style settings in the JetMenu Custom menu Module documentation block.Keep reading this tutorial if you want to learn how to create a menu similar to the one shown below.
Step #4: Set Main Menu Items Style
- Let’s proceed to Main Menu Items style settings. First, we need to customize them in the normal mode.
- Specify the necessary background color (in our case it is rgba(60,137,178,0.29)).
- Use the needed text color (in our example it is #89c8ff).
- Enable Typography settings to apply the font settings for the menu items.
- We used Playfair Display font family.
- Specify the border radius value in the Border radius block (we used 6 px).
- Enable Box Shadow option. Set the shadow color (we used rgba(0,0,0,0.5)).
- Reduce the Blur value to 3.
- Now let’s switch to Hover mode.
- Here let’s specify the Text Color value (we used #4cff64). All the other options will remain the same.
Examples
If you don’t wanna go through all the links you can also go to the images tab to see some of the results.
- Config / Result
- Config / Result
- Config / Result
-
Config/ Result (Custom button text colors & textures) - Config / Result
- Config / Result
- Config / Result
- Config / Result
- Config / Result
- Config / Result
- Config / Result
- Config / Result <- Slideshow example
- Config / Result <- New Action stuff
- Config / Result
- Config / Result
- Config / Result
- Config / Result
- Config / Result
- Config / Result
- Config (1) (2) / Result
- Coming Soon (Also if you have made something nice feel free to post the config & an image of it)
Some of these examples might not work / look properly with the latest CMM version due to changes in the format, they will still provide insight on how the stuff displayed in the example was done though. Also some of these examples might require custom images, these will therefore also look a bit weird when you use them yourself.
More to Love…
Choose a professional design from the largest library of menu templates on the web.
Keep your branding consistent with matching sets for dine-in, takeout, table tents and more.
Import menu items from previous designs for quick menu creation.
Craft your unique aesthetic with custom fonts, brand palettes, and imagery.
1000+ Fonts
Find the font that best speaks for your food with more than 1000 styles to choose from.
Upgrade your menu with professional food photos and seasonal imagery.
Upload photos, then drag and drop them into your design. It’s that easy!
With a single click, resize to 11 standard paper sizes, or create a custom size to suit your needs.
Getting a professional look is easy with smart grid, margin, and ruler tools.
Create and store as many menus as you want. Organize them into folders and come back to them at any time.
Make instant menu updates on the go with your phone or tablet.
Best-in-Industry Printing
Don’t compromise quality with the local copy shop. Our printer specializes in restaurant products, for professional results every time.
Find all the key menu products you need, from laminated dine-in to folded takeouts to digital displays.
Publish your menu online or connect it to an editable QR code with our sharing tools.
To create a menu for your social accounts is even easier than creating a regular one. Click the “create a new menu” link, input the name, and click Create Menu.
The next step is to check the Social Links Menu box at the bottom, and use the Custom Links tab to add your social media links.
For example, you can input “Twitter” as the Link Text and paste in your Twitter account’s address in the URL field. Then click on Add to Menu, and your Twitter account will be added to the social menu.
Don’t forget to always click on Save Menu before previewing or leaving the page.
This is what my two custom menus look like after going through the steps above (I used the Twenty Fifteen theme):
Was this tutorial useful to you? Let us know how was your first experience with creating a custom menu in WordPress.
Custom menus in #WordPress — how to create and manage them easily
To create custom menus is actually really simple. I used Twenty Fifteen, WordPress’ default theme, to show you all the steps you need to take in order to build your own custom menus.
Let’s take it one step at a time.
To customize the default menu of your website, you have to enter the WordPress dashboard, click on Appearance and then on Menus. The first thing you need to do is to give the menu a name, and then click the Create Menu button.
After creating it, you may start adding your menu items. All your website’s categories, posts, and pages are gathered in the left column, and from there, you can simply add them to your custom menus in just a few clicks.
First of all, you need to click on Pages and View All. Select all the pages that you want to appear in your menu (use the checkboxes next to the pages’ names).
I selected all of them for the test, but you should use only the ones you need.
After selecting the menu items, you might want to switch their order. All you have to do is drag and drop them in the desired location. This is how you’re going to organize your custom menus.
Apart from standard menus, you can also create sub-menus. Simply drag a menu item to the right of another menu item. Like so:
Sub-menus will work like drop-down menus. If you want a certain item to belong to another one, all you need to do is to drag it a bit to the right, right below the “parent item.”
Основные права ChestCommands:
— chestcommands.open.* — Разрешает открывать все меню на вашем сервере. — chestcommands.open..yml — Разрешает открывать определенное меню.
— chestcommands.command.help — доступ к команде /cc help
— chestcommands.command.open — доступ к команде /cc open <file>
— chestcommands.command.open.others — доступ к команде /cc open <file> Примечание : это разрешение также предоставляет доступ для открытия всех меню.
— chestcommands.command.list — доступ к команде /cc list
— chestcommands.command.reload — доступ к команде /cc reload
— chestcommands.sign — требуется для создания знаков меню.
— chestcommands.economy.bypass — обход экономии затрат.(что бы всё было бесплатно)
— chestcommands.update — получать уведомления об обновлениях при присоединении.
History[]
| Java Edition Indev | |||||
|---|---|---|---|---|---|
| 0.31 | The menu screen was added. | ||||
| Java Edition Infdev | |||||
| Minecraft Infdev | The «Generate new level…» button was replaced by a Singleplayer button. | ||||
| The «Load level..» button was replaced by a Multiplayer button, which wasn’t playable at the time. | |||||
| Added «Loading…» screen. | |||||
| Unknown | |||||
| ? | «Multi player» has been changed to «Multiplayer» | ||||
| Java Edition Alpha | |||||
| v1.0.4 | Replaced «Loading…» screen with a Mojang splash screen. | ||||
| v1.0.10 | The Multiplayer button was no longer greyed out as SMP was added, although it was only for testing at this stage. | ||||
| v1.0.12 | Changed «Save and quit to title..» to «Save and quit to title». | ||||
| v1.2.0 | preview | RAM usage information no longer shows up on the top right corner. | |||
| v1.2.2 | Removed the «Play tutorial level» button, replaced by «Mods and Texture Packs» | ||||
| Java Edition Beta | |||||
| 1.0 | The «Options…» button was made much closer to the «Mods and Texture Packs» button. | ||||
| 1.3 | The gap between «Options…» and «Mods and Texture Packs» was reverted. | ||||
| The «Options…» button was made smaller to make room for the «Quit Game» button. | |||||
| 1.8 | (preview) | Completely revamped the title screen adding a version tag in the bottom left corner and new options in the option menu. | |||
| Java Edition | |||||
| 1.0.0 | Beta 1.9 Prerelease 6 | «Mods and Texture Packs» button changed to «Texture Packs» | |||
| RC1 | The «Quit Game» button now appears regardless of how the game is launched. | ||||
| 1.1 | 11w49a | Added language select button. | |||
| Renamed «Save and quit to title» button to «Save and Quit to Title». | |||||
| 1.4.2 | 12w37a | Added «Re-Create» option to the World selection menu. | |||
| 1.5 | 13w03a | The «Texture Packs» button has been moved to the «Options…» screen. | |||
| 13w09a | The «Minecraft Realms» button is moved to the main screen, taking the spot of the «Texture Packs» button. | ||||
| 2013 Music Update | Added menu music. | ||||
| 1.12 | pre6 | Added the ability to view the credits when clicking the copyright text. | |||
| 1.14 | 19w06a | Added loading bars while loading the game and reloading resources. | |||
| 19w11a | Added Tab ↹ support for the main menu. | ||||
| 19w13a | Added the «Accessibility Options» button to the main menu. | ||||
| 1.15.2 | pre1 | Clicking the «Multiplayer» button from the main menu now displays a disclaimer stating that «Online play is not rated». | |||
| 1.17 | 21w03a | Holding ⇧ Shift while clicking menu buttons now cycles through options in the reverse order. | |||
| Pocket Edition Alpha | |||||
| v0.1.0 | Added the menu screen. | ||||
| v0.7.0 | Completely revamped the title screen adding a version tag in the bottom left corner and new options in the option menu. | ||||
| v0.7.3 | Added the splash text to the main menu. | ||||
| v0.7.6 | Removed the «Play on Realms» button from the main menu. | ||||
| v0.11.0 | build 1 | Added a language button to the main menu. | |||
| v0.13.1 | Moved the skins button to the main menu. | ||||
| Options button is no longer a wrench icon. | |||||
| v0.14.0 | build 1 | Revamped menu screen. | |||
| v0.16.0 | ? | Removed language button | |||
| Bedrock Edition | |||||
| 1.5.0 | beta 1.5.0.10 | Reorganization of the main menu buttons. | |||
| 1.12.0 | beta 1.12.0.3 | Renamed «Store» to «Marketplace». | |||
| 1.13.0 | beta 1.13.0.15 | The «Achievement» and hangar buttons have been moved into a new «Profile» button. | |||
| 1.16.200 | beta 1.16.200.55 | Added a UI startup screen to inform players if they are on outdated graphics drivers. | |||
| 1.17.30 | beta 1.17.30.20 | The feedback button now appears at the down left as an icon. | |||
| The options, achievements or invite button now appear besides the feedback button. | |||||
| Legacy Console Edition | |||||
| 1.66.0016.0 | Added the menu screen. | ||||
| 1.66.0033.0 | Removed the greyed out «Multiplayer» button. | ||||
| 0.66.0054.0 | Added menu music. | ||||
| TU8 | Renamed «Download Content» to «Minecraft Store». | ||||
| TU36 | CU25 | Patch 7 | 1.0.1 | Added mini games to the menu screen. | |
| CU58 | Removed the «Download the latest version of Minecraft for FREE!» button from the main menu. |
Вывод произвольных меню
Меню зарегистрированы и созданы, осталось добавить их в шаблон с помощью функции .
Выводит произвольное меню, созданное в панели: «Внешний вид • Меню». Какое именно меню навигации выводить, указывается в параметре или .
Чтобы тема поддерживала меню, нужно включить эту возможность с помощью:
add_theme_support('menus');
Или можно зарегистрировать место для меню, с помощью , тогда поддержка меню темой включиться автоматически.
wp_nav_menu(
    'theme_location'  => '',
    'menu'            => '',
    'container'       => 'div',
    'container_class' => '',
    'container_id'    => '',
    'menu_class'      => 'menu',
    'menu_id'         => '',
    'echo'            => true,
    'fallback_cb'     => 'wp_page_menu',
    'before'          => '',
    'after'           => '',
    'link_before'     => '',
    'link_after'      => '',
    'items_wrap'      => '<ul id="%1$s" class="%2$s">%3$s</ul>',
    'depth'           => ,
    'walker'          => '',
);
- (строка). Идентификатор расположения меню в шаблоне. По умолчанию пустая строка.
- (строка). Меню которое нужно вывести. Соответствие: , или название меню. По умолчанию пустая строка.
- (строка/false). Чем оборачивать тег. Допустимо: , или . По умолчанию: .
- (строка). Значение атрибута у контейнера меню. По умолчанию: .
- (строка). Значение атрибута у контейнера меню. По умолчанию пустая строка.
- (строка). Значение атрибута у тега . По умолчанию: .
- (строка). Значение атрибута у тега . По умолчанию: .
- (строка). Шаблон обёртки для элементов меню. Шаблон обязательно должен иметь плейсхолдер , остальное опционально. По умолчанию: .
- (строка). Функция для обработки вывода, если никакое меню не найдено. Установите пустую строку, чтобы ничего не выводилось, если меню нет. По умолчанию: .
- (строка). Текст перед тегом в меню. По умолчанию пустая строка.
- (строка). Текст после каждого тега в меню. По умолчанию пустая строка.
- (строка). Текст перед анкором каждой ссылки в меню. По умолчанию пустая строка.
- (строка). Текст после анкора каждой ссылки в меню. По умолчанию пустая строка.
- (число). Сколько уровеней вложенности показывать. По умолчанию ноль (все уровни).
- (строка). Оставлять или нет переносы строк в HTML коде меню. Может быть: или . По умолчанию: .
- (логическое). Выводить на экран () или возвратить для обработки (). По умолчанию: .
- (объект). Объект класса для построения меню. По умолчанию: объект .
Чаще всего для указания, какое меню выводить, используют параметр :
wp_nav_menu(
    'theme_location'  => 'header_menu'
);
Но можно использовать и параметр :
wp_nav_menu(
    'menu'  => 'Главное меню'
);
Результат будет одинаковый:
<div class="menu-%d0%b3%d0%bb%d0%b0%d0%b2%d0%bd%d0%be%d0%b5-%d0%bc%d0%b5%d0%bd%d1%8e-container">
    <ul id="menu-%d0%b3%d0%bb%d0%b0%d0%b2%d0%bd%d0%be%d0%b5-%d0%bc%d0%b5%d0%bd%d1%8e" class="menu">
        <li id="menu-item-1911" class="menu-item menu-item-type-post_type menu-item-object-page menu-item-1911">
            <a href="http://www.server.com/about-author/">Об авторе блога</a>
        </li>
        <li id="menu-item-1912" class="menu-item menu-item-type-post_type menu-item-object-page menu-item-1912">
            <a href="http://www.server.com/feedback/">Обратная связь</a>
        </li>
        <li id="menu-item-1913" class="menu-item menu-item-type-post_type menu-item-object-page menu-item-1913">
            <a href="http://www.server.com/test-page/">Тестовая страница</a>
        </li>
        <li id="menu-item-1914" class="menu-item menu-item-type-custom menu-item-object-custom menu-item-1914">
            <a href="https://wp-kama.ru/">Сайт WP-KAMA</a>
        </li>
    </ul>
</div>