Micdoodlecore 1.12.2 curseforge
Содержание:
- Mod conflicts: Binary Seach method
- Non-fixable issues
- Day-night cycle
- Geological Features
- Step Five: Collecting Oxygen
- Usage
- Full Guide
- Mobs
- Step Six: Building a Rocket
- Obtaining
- Step Three: Crafting Machines
- Tips
- Crash involving GCEntityClientPlayerMP
- Overview
- Step One: Gathering Resources
- Op-only commands
- Introduction
Mod conflicts: Binary Seach method
So you have this huge modlist of 50 or more mods, and one of them is conflicting with Galacticraft, but it’s not obvious which one. How do you figure that out, without restarting the game 50 times?
A binary search method can find which mod is conflicting in just 6 restarts of the game.
The concept is you divide your modlist in half — remove half of the mods — then see if the game still has the issue. If the game still has the issue, then you know the problem is in the half of the mods you kept. If the issue stopped happening, then you know the problem is in the half of the mods you removed.
Steps:
Step 1. create a new folder /mods_removed and move half the mods from the /mods folder to it (keep together mods which have to go together, for example some mods have to be paired with core mods or libraries like Mantle)
Step 2. make a note or screenshot of the mods you just moved, because you will need to know later which is which — or maybe make subfolders in the /mods_removed folder so you know which group is which;
Step 3. start the game, create a new world, see if you stil have the issue or not;
Step 4A. if the issue was fixed, look at the mods you just removed, pick half of them and move that half back into the /mods folder, keeping a careful note of which mods these are, then go to Step 3;
Step 4B. if the issue was not fixed, pick half of the remaining mods (or half of the ones most recently added back in at Step 4A) for removal, and go to Step 1
Obviously you must not use an existing world before doing these tests, because changing mods around will damage any existing world. If you have to have an existing world because you need a complex build, keep a full backup.
Non-fixable issues
These will need to be fixed by the authors of the other mods.
More Player Models
We cannot offer compatibility with this mod, as it uses an approach which is not really compatible with other mods. You may have improved results if you install Player API and Render Player API, try it and see.
Too Much Time
This mod’s dimension handling will cause crashes whenever you travel to a Galacticraft dimension, so basically Galacticraft is unplayable if you have Too Much Time installed.
Shaders Mod
Karyonix GLSL Shaders Mod is currently unsupported; the sky will not look good on Galacticraft planets or space environments. Best would be if that mod can auto-disable itself in Galacticraft dimensions.
Day-night cycle
Mars’s day-night cycle is synchronized with Overworld’s, and is therefore 20 minutes long, made up of 10 minutes of daylight and 10 minutes of night.
After sunset, the environment darkens but not as much as the Moon’s and hostile mobs will be able to spawn on surface. Since the sunrise and sunset of both planets happen at the same time, the best moment to travel to Mars is during the Overworld’s dawn (about 1.5 minutes before the sunrise), so that you have enough time to set up a quick base on Mars before the sunset.
Due to a bug in Galacticraft 2, the sun and stars were visible only on far-view distance. It is now fixed.
Geological Features
Surface
Mars terrain (true color).
Mars topography (the brighter, the higher).
The surface of Mars is riddled with craters, tall hills and deep valleys and its height may vary sharply from y=50 to y=140. It is covered by Mars Surface Rock and, underneath it, Mars Sub-Surface Rock. The martian soil is completely sterile, unless you use a Terraformer to convert it into cultivable soil.
In Galacticraft 3 and Galacticraft 4 there are rare patches of Ice under the surface.
Underground
The planet’s underground features include caves like those of the Overworld’s and also huge sludge-flooded caverns which are large and tall circular rooms underground, where poisonous plants, the Cavernous Vines, grow from the ceiling and the floor is mostly flooded with Bacterial Sludge.
Tin, copper, iron and Desh ores can be found on Mars. Desh is an important ingredient for some of the more advanced blocks and items in Galacticraft! And Desh armor gives very solid tank-like protection, including reduced knockbacks.
Naturally generated lava and water pools do not exist on Mars.
Step Five: Collecting Oxygen
Eventually, you will be able to create oxygen while in space. But your first time up, it’s a rather crucial resource to bring with you!
Oxygen Collector
First, you will need to create an Oxygen Collector, which likewise requires power to run. In the Overworld, you can place it anywhere to begin gathering oxygen.
In space or a no-atmosphere environment, you would need to surround the Oxygen Collector either with leaves or growing wheat. But in the Overworld, you can place it anywhere, it just takes oxygen out of the air.
Oxygen Pipe
In order to do anything with the oxygen collected by the collector, you will need to create Oxygen Pipes using six panes of glass on the regular crafting grid — three across the top and bottom.
You will use the Oxygen Pipe to feed the Oxygen from the Oxygen Collector to the…
Oxygen Tanks
You will use the Oxygen Compressor to fill Oxygen Tanks. There are three sizes of oxygen tank that you can build — the Light Oxygen Tank, the Medium Oxygen Tank, or the Heavy Oxygen Tank. In order to have ample time to start your moon base, bringing multiple medium or heavy tanks is recommended. For detailed information on oxygen tanks as well as how to put on your spacesuit, head over to the Oxygen Tutorial page.
Usage
The Astro Miner is an automatic mining vehicle which moves around, making tunnels and mining up everything it finds, and brings it all back to a base station where it docks. It is not player-rideable* so do not try and climb inside it!
(* OK, there are other mods which allow you to put a saddle on anything including some quite surprising things as in the movie Dr Strangelove, in which case maybe they become rideable after all.)
The Astro Miner is the ultimate automatic mining system in Minecraft!
It has certain similarities with:
- a Railcraft Tunnel Bore — but it does not need rails, it’s a lot smarter and more flexible, and it returns to its base and unloads itself.
- a ComputerCraft Mining Turtle — but you do not need to program it!
- a Buildcraft Quarry — but it is fully mobile, and also lag-free.
Additional advantages are that it looks awesome, and it works in space: it is optimised for mining asteroids! An Astro Miner busy hunting out and mining asteroids for you in the depths of space is a pleasure to see.
Assembling the base
- You will require:
- 8 Astro Miner Base blocks
- an Astro Miner
- Place down the 8 Astro Miner Base blocks in a 2 x 2 x 2 cube — when correctly placed, they should transform into an industrial looking dock. At this point make sure the opening in the dock it is facing in the direction you want the Astro Miner to be mining. Facing outwards from your base is a good plan if you don’t want your precious space base to get all chewed up. You can wrench the dock to rotate it.
- When you are ready, right click the Astro Miner Base with the Astro Miner item to place an Astro Miner (you cannot wrench the dock after an Astro Miner has been placed in it)
- Connect power to the Astro Miner Base, let it power up for a few seconds, and enjoy!
You will be warned in chat if you cannot place the Astro Miner — for example if:
- the Astro Miner Base already has an Astro Miner
- there is not enough clear space to place it (because a protected or non-minable block, such as chests or wiring or machinery, is present)
- the player already has the maximum allowed number of Astro Miners: there is a server-set limit on the number of Astro Miners a player can have in the game: it’s configurable, the default is 6. (This was 4 in early beta versions of the Astro Miner. Your current number can be seen using the command.)
If you need to stop the Astro Miner, just hit it to break it, like hitting a rocket.
To get the blocks it has mined:
- the Astro Miner Base works like a chest, you can open it and see the items in it
- blocks can be extracted from the Astro Miner Base using hoppers (placed beneath it) or any type of item pipe or duct from other mods
- breaking the Astro Miner Base will drop all the items it currently contains — but if you break it, the Astro Miner will not be able to dock (unless you put back another Astro Miner Base at exactly the same spot)
- breaking the Astro Miner will drop any items it currently contains, but is not the best plan because then it will forget its route
The Astro Miner has special mining AI for the Asteroids dimension — it knows how to go find the asteroids and mine out only their cores. (This has been in planning for 6 months or more! All this time your Galacticraft world has been carefully saving a list of where the asteroids are, ready for this day!)
Full Guide
Before we begin: Mod Compatibility Notes
Some quick points that you will be interested in if you are using Galacticraft in conjunction with other mods. For full notes on compatibility see Compatibility.
Power Sources
Some Galacticraft machines need power to function. This can be provided in the form of:
- Galacticraft energy (from the Coal Generator, Basic Solar Panel, or Advanced Solar Panel)
- RF (Redstone Flux) (requires Thermal Expansion in Galacticraft 2 — Galacticraft 3 and Galacticraft 4 work with all RF mods)
- Mekanism J (Joules)
- IC2 EU (Energy Units)
- Buildcraft MJ (Minecraft Joules)
- Universal Electricity’s UE units (Galacticraft 1 only)
Ore Dictionary
Galacticraft’s ores and fluids are registered with the ore dictionary, thus making them compatible with most other mods. For example, Galacticraft Copper Ingots and Tin Ingots are interchangeable with: Mekanism, IC2, Tinker’s Construct, Thermal Expansion or Forestry copper and tin. Galacticraft Oil and Rocket Fuel are interchangeable with Buildcraft oil and fuel. EnderIO Rocket Fuel Buckets can also be used in your Fuel Loader.
Aluminum Ore can be powdered in Thermal Expansion’s Pulverizer. From version 139 (February 2018), Galacticraft 4 also lets Aluminum Ore be ground in a Grindstone from Applied Energistics 2 or it can be macerated in an IC2 Macerator (and then processed further in IC2 by ore washing and thermal centrifuge).
Mobs
Slimeling
Slimelings are tameable mobs found on Mars. Slimeling Eggs have a chance to spawn on the surface of Mars. They can be red, blue or yellow. They can be renamed and fed to create mini-slime bodyguards.
Sludgeling
Sludgelings are some kind of macro-bacteria that spawn in swarms in the Bacterial Sludge. They attack any mob, including the players. A Sludgeling swarm takes place when any mob touches or gets close enough to the bacterial sludge.
Boss
The Mars boss is the Evolved Creeper Boss, which can be found in the Mars dungeons. The boss is a three-headed giant Creeper that has an Oxygen Mask and shoots TNT at the player on sight.
Step Six: Building a Rocket
Reviewing steps completed so far: you’ve gathered ore and oil, created a power source (perhaps even solar power), crafted various machines for processing ore and filling both fuel and oxygen tanks, you’re wearing your spacesuit gear — or at least the oxygen-related components — since it’s always a good idea when leaving solid ground to carry a Parachute, add that too. The last slot on the spacesuit tab is for a Frequency Module — it’s optional, but will help you hear sounds properly while in space (it’s also used with the Telemetry Unit so that your buddies can keep track on you from your base, if you are playing with friends).
Every space program of course needs a rocket. It’s now time to get to work on that. First up, build the NASA Workbench — right click to view the Tier 1 Rocket layout. Insert the various components to make the rocket — nose cone, plating, fins and of course, the engine. Pro Tip: wooden chests are optional, but not expensive, so you should always add 3 wooden chests when crafting your rocket to give it the maximum cargo hold.
Build a launch pad and place your rocket on it and you’re almost ready for take-off!
Installing a Fuel Loader next to the launch pad enables the loading of fuel via canisters made in your Refinery. Other mods can also enable piping fuel directly, rather than using canisters. Click the Load Fuel button to start the fuelling process for your rocket. Enter your rocket and press «F» to not only view the fuel load percentage but also your inventory and — if you added chests during assembly — the inventory of the rocket itself.
Obtaining
Orion Drive
Crafting it requires the Orion Drive as a recipe component. The schematic for the Astro Miner is a possible treasure item in the Mars dimension, upon defeating the Evolved Creeper Boss, and building the Orion Drive requires samples of ore from every dimension including Asteroids.
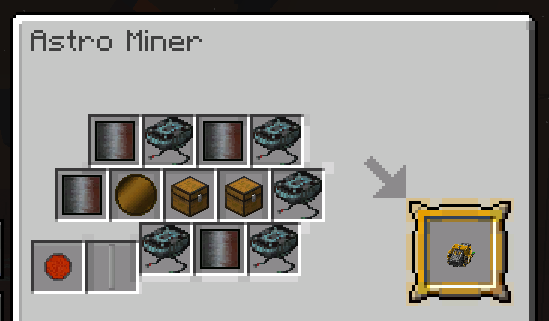
Crafting
To build the Astro Miner you will need to have unlocked the Astro Miner Schematic which is available as a treasure item after killing the Evolved Creeper Boss on Mars, but only for players who have already unlocked the Tier 3 Rocket Schematic or who have already travelled to the Asteroids dimension in some other way.
Ingredients:
- 5 x Orion Drive — note, this will need 5 of many types of ore
- 1 x Advanced Wafer
- 1 x Beam Core
- 1 x Pole
- 4 x Heavy Duty Plate
- 2 x chest
Recipe in the NASA Workbench:
Step Three: Crafting Machines
Galacticraft has quite a number of machines — usually the size of a crafting table — that perform some amazing functions. This part of the tutorial covers the basic machines you need to start off with.
Although the orientation of a simple crafting table doesn’t matter much, the machines you create using Galacticraft have some unique sides to them. Some might require power input on a particular side, some might produce oxygen on another side, and so on. Many of the machines need electricity to power up, though a couple of them are powered using coal.
Like regular Furnaces and Crafting Tables, usually right-clicking on the machine will let you view its console. Moving your mouse over the slots in the machine’s console will give you some information about what each part does, and what materials go where.
Circuit Fabricator
The first machine that you will want to build is the Circuit Fabricator, since it creates the Basic Wafer and Advanced Wafer which are essential components used in many of the other machines. (It also creates Solar Panels which you will use later to make solar power.)
Side Note (Galacticraft 2 only): If you power a Circuit Fabricator via a Buildcraft kinesis pipe network, we recommend using an iron kinesis pipe to limit the power that it draws. It works fine on an iron pipe at the lowest 2 MJ setting, but connected directly to a high-power pipe network, it can draw all available power.
Compressor
Now that you are able to create a Basic Wafer, the next machine to build is a Compressor, which compacts ingots into more durable, compressed versions of the material. The Compressor runs on coal, or other combustibles. Later you will be able to make an Electric Compressor that runs from a power source instead, but since it requires compressed materials to build, you need to make the coal-fired one first.
Tips
- On servers, the Astro Miner will operate only while the player who owns it is online — if the player logs out or is kicked from the server, the Astro Miner will immediately stop and go into a dormant state, with its engines and scanning beams off. This is to prevent it from mining up the whole map for an offline player. While in the dormant state, it cannot be damaged or broken, except by a player who is in Creative Mode.
- An Astro Miner will only move and operate if the chunk it is in is loaded and entities are active in that chunk. It is the same behaviour for a minecart in the vanilla game and the machines in most other mods. To be active will normally require it to be 2 chunks inside the chunk loading radius, for example if the chunk loading radius is 8 chunks (128 blocks) then the Astro Miner would need to be maximum 6 chunks (96 blocks) from the nearest player to continue operating. This may also depend on server settings, on managed servers.
- If the Astro Miner finds something it cannot or will not mine, then it will turn around and go back to its base. If it is already returning to its base when obstructed, then it will stop where it is and the player will see a chat message warning of that: sometimes (every 30 seconds) it will try to start moving again, but it cannot start moving until the path is unblocked.
- For this reason, the Astro Miner does not function well at very deep levels underground (below around y = 15) as it will frequently encounter bedrock and return to base
- If you break the Astro Miner Base when it has an Astro Miner, the Astro Miner will eventually come back to the base location and stop there, with a message in chat about its base being destroyed. (The player had better then break the Astro Miner too.)
- The Astro Miner will respect Grief Prevention / WorldGuard type plugins, so that it should be impossible for it to mine in another player’s protected land. (We have had no reports of problems in over 6 months, but if there are problems please inform the Galacticraft develops in the usual way via the Github Issues list.)
Crash involving GCEntityClientPlayerMP
People sometimes report crashes involving GCEntityClientPlayerMP or GCPlayerBaseSP. In 99% of cases, these are not Galacticraft crashes, it’s another mod crashing.
Explanation: Galacticraft changes the internal name of the vanilla player in Minecraft from EntityClientPlayerMP to GCEntityClientPlayerMP. Because of this change, whenever there is any mod crash involving the player, it will look like the Galacticraft version of the player, «GCEntityClientPlayerMP», is maybe involved. It’s not really involved at all. Galacticraft is not the cause of these types of crashes, the same way that vanilla Minecraft is not the cause.
We request people who are smart enough to read the crash report and see GCEntityClientPlayerMP in it, also stop and think about this. As with any other crash report, it’s whatever is at the top of the crash report which is causing the problem — not what’s in the middle.
Here are some examples:
NoSuchMethodError on world load
---- Minecraft Crash Report ----
// My bad.

Time: 19/04/15 12:52 PM
Description: Unexpected error

java.lang.NoSuchMethodError: com.mojang.authlib.minecraft.MinecraftProfileTexture.<init>(Ljava/lang/String;)V
        at net.minecraft.client.entity.AbstractClientPlayer.downloadCape(AbstractClientPlayer.java:159)
        at net.minecraft.client.entity.AbstractClientPlayer.<init>(AbstractClientPlayer.java:51)
        at net.minecraft.client.entity.EntityPlayerSP.<init>(EntityPlayerSP.java:79)
        at net.minecraft.client.entity.EntityClientPlayerMP.<init>(SourceFile:36)
        at micdoodle8.mods.galacticraft.core.entities.player.GCEntityClientPlayerMP.<init>(GCEntityClientPlayerMP.java:18)
        at net.minecraft.client.multiplayer.PlayerControllerMP.func_147493_a(PlayerControllerMP.java:399)
Ticking entity error
---- Minecraft Crash Report ----
// Why did you do that?

Time: 4/10/15 2:08 AM
Description: Ticking entity

java.lang.NullPointerException: Ticking entity
        at com.flashoverride.heartdrop.HeartDropEventHandler.onEvent(HeartDropEventHandler.java:75)
        at cpw.mods.fml.common.eventhandler.ASMEventHandler_1070_HeartDropEventHandler_onEvent_LivingAttackEvent.invoke(.dynamic)
        at cpw.mods.fml.common.eventhandler.ASMEventHandler.invoke(ASMEventHandler.java:54)
        at cpw.mods.fml.common.eventhandler.EventBus.post(EventBus.java:138)
        at net.minecraftforge.common.ForgeHooks.onLivingAttack(ForgeHooks.java:292)
        at net.minecraft.entity.player.EntityPlayer.func_70097_a(EntityPlayer.java:978)
        at net.minecraft.entity.player.EntityPlayerMP.func_70097_a(EntityPlayerMP.java:491)
        at micdoodle8.mods.galacticraft.core.entities.player.GCEntityPlayerMP.func_70097_a(GCEntityPlayerMP.java:73)
        at net.minecraft.entity.monster.EntityMob.func_70652_k(SourceFile:101)
Explanation: This is a crash in the HeartDrop mod, as shown by the top line of the crash report.
Overview
Currently there are 6 dimensions in total. These are the dimensions included in Galacticraft:
| Dimension | Type | Dimension ID | Spaceship Tier Pass | Icon | Image |
|---|---|---|---|---|---|
| Overworld | Planet | 0 (vanilla) | (none) | ||
| Overworld Space Station | Space Station | -27 | Tier 1 | ||
| Moon | Moon | -28 | Tier 1 | ||
| Mars | Planet | -29 | Tier 2 | ||
| Asteroids | Asteroid Belt | -30 | Tier 3 | ||
| Venus | Planet | -31 | Tier 3 |
Basic specs about the dimensions:
| Dimension | Rain | Day Length | Gravity | Meteors | Sunlight | Audibility | Oxygen | Temperature | Wind |
|---|---|---|---|---|---|---|---|---|---|
| Overword | Yes | 24000t | 1.00 | 0.0% | 1.00 | Yes | 0.0 (neutral) | 1.00 | |
| Overword Sp. Station | No | 24000t | 0.00 | +100.0% | 0.02 | No | 0.0 (neutral) | 0.10 | |
| Moon | No | 192000t | 0.18 | 1/7000 | +40.0% | 0.05 | No | 0.0 (neutral) | 0.00 |
| Mars | No | 24000t | 0.38 | 1/10000 | -48.8% | 0.10 | No | -1.0 (cold) | 0.30 |
| Asteroids | No | Infinite | 0.10 | 1/10000 | -62.7% | 0.10 | No | -1.5 (cold) | 0.05 |
| Venus | No | 720000 | 0.61 | — | ? | ? | No | +5 (hot) | 0.30 |
Step One: Gathering Resources
Overworld Ores
The first thing is to gather Tin Ore, Copper Ore, and Aluminum Ore (which can be smelted into Tin Ingots, Copper Ingots, and Aluminum Ingots respectively). You will also want to find some Silicon Ore, which is rarer than the other three ores and forms at deeper levels (drops Raw Silicon when mined).
Oil
If Galacticraft is the only mod that you have installed, you can gather oil using either regular buckets, or Empty Canisters and a Portable Oil Extractor — we’ll get to these in a minute.
If you have Buildcraft installed, the recommended method for gathering oil is by using a pump and Buildcraft or Railcraft tanks. Buildcraft also has the ability to gather oil in buckets. Forestry gives you the option of using tin cans, which are cheap, but single-use. Or, you can wait until we’ve created the Galacticraft tools necessary for oil collection.
Op-only commands
These commands are available only for ops (or from the server console). Note that being in NEI’s Cheat Mode is the same as being an op. In single player, you are automatically «Op» if you created the world and if you set «Enable cheats = On» in the world options when you created it (there are also ways for advanced users to change this later, by editing the levels.dat file).
dimensiontp
/dimensiontp — take the named player directly to the Planet Selection Screen without riding a rocket. If the argument is omitted, you will be teleported.
gcinv
/gcinv <save|restore|drop|clear> <playername> — applies the relevant command to the extended Galacticraft inventory slots (save the inventory for a later restore, clear it, or force drop all items). This is intended for use by automatic systems including other server mods and plugins. It can be used if you need to save+clear and later restore player inventories when they enter and leave a certain area (for example, a Spleef arena or other BattleArena). Detailed guide to the /gcinv command
gckeeploaded
/gckeeploaded — keeps a dimension (for example, a space station) from unregistering on a server when all players have left the dimension. This is needed for certain things to work properly on servers, for example Essentials teleport commands including and . There may be other solutions for the same problem. It should not be needed for planets, which are static dimensions (they stay registered all the time). It will not cause any lag. See also: Tutorials/Space Station for Server Admins
gckit
/gckit — gives a Space Emergency Kit item to the named player, or to yourself if no player was specified.
gcastrominer
/gcastrominer <show|reset|set<number>> <playername> — shows the number of Astro Miners a player currently has placed in the world. It can be reset to 0, or set to a given number. Players are not allowed to place more Astro Miners than a server set maximum limit (controlled by the config setting «`astroMinerMax«` in planets.conf, the default is 6). A situation where a server admin might use this is if a player lost an Astro Miner or it was destroyed by a chunk reset, map save error, etc etc.
gcssnewowner
/gcssnewowner <dim#> <playername> Each space station has 1 player who ‘owns’ it, and each player can only own 1 space station per planet orbited. Ownership gives guaranteed access to the space station for that player from his rockets, and allows the player to use the «`/ssinvite«` and «`/ssuninvite«` commands to invite his friends. The «`/ggssnewowner«` command allocates a new owner to an existing space station. Note: this command does not check whether the new player already owns a space station orbiting the same planet — but if the new player already owns a space station, he will lose ownership of it, so it will be ownerless until a new owner for it is set using this command.
Introduction
Building rockets, space stations and colonies on new worlds may seem a little overwhelming, if you’re just starting out. So here is a small guide to getting started with Galacticraft!
Quick Start
Before you head into space, you will need a few items including the Tier 1 Rocket, Rocket Launch Pad, Fuel Loader, Fuel Canister, Oxygen Gear, Oxygen Mask, Oxygen Compressor, Oxygen Tanks, Parachute.
Later, for a proper scientific look (once you have obtained the basic items from a Circuit Fabricator and a Compressor), you can power your base using Basic or Advanced Solar Panels which track the movement of the sun.
The NASA Workbench and Refinery are needed to create your rocket and make the fuel for it. You will also need plenty of raw materials: a stack or more of iron ore, copper ore, tin ore, aluminum ore, and some silicon.
Additionally, you can make a Display Screen to place in your control room, which shows some of the planets and other interesting information.
Life Support and a Parachute
If you don’t take oxygen equipment with you into space, you will die. The four most crucial items you will need are the Oxygen Gear and Oxygen Mask and Oxygen Tank, and a Parachute of course. Once you have this equipment, you are almost ready.
Launch Your Ship
You will need to make the Rocket Launch Pad and Tier 1 Rocket, of course. Make the rocket in the NASA Workbench.
Place the nine rocket launch pads you have on the ground in a 3×3 square shape, so they join up to make a launch pad. Place your rocket on top of them. You will then place a Fuel Loader directly adjacent on any side of the launch pad. You are all but ready. You will of course need some Fuel to put in the Fuel Loader. If you haven’t found any oil yet, go ahead and get some, which generates deep in the ground around the gold ore level. Use a Portable Oil Extractor to place the oil into canisters, take those Oil Canisters to your Refinery and start converting the crude oil to Rocket Fuel. Place the Fuel Canisters in the Fuel Loader and click the load fuel button to have it fuel your rocket.
You can now go to the Moon! All you have to do is equip your Parachute and Oxygen Gear and mask, climb in your rocket, and hit Launch. If you want to be able to come back again, it’s also essential that you take a Fuel Loader with you, also a couple of charged batteries or something else to power it with and an Empty Canister, a spare Fuel Canister would also be wise just in case.
Once you reach the Moon, you can finally explore the lunar surface for Moon Village(s) or even the prized Moon Dungeon. For a longer stay, build a .
Next stop, Mars!